You can create new splits manually or edit some splits for the selected part manually. To enter new splits for the selected part, you will first need to uncheck the Auto Split column on the Large Parts page for that particular part. This in turn will enable the Edit split column button.
Now, when you will click this button, a dialog as shown below will appear.
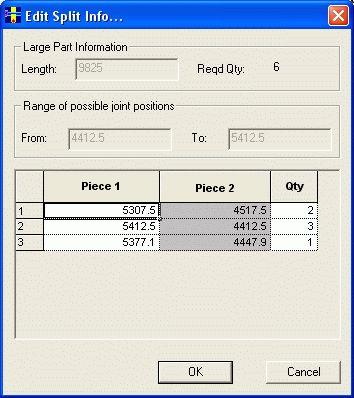
In this dialog, the length of the part is shown along with it the required quantity is also displayed. You need to enter only the 'Piece1' length and the required split qty, 'Piece2' length is calculated automatically.
A part can be split in different ways. All this splits will be considered only, if they satisfy the Joint Rules and that the quantity of split is not greater than the required quantity of the part. Both this conditions are checked when you click OK. If you click cancel, the changes you made won't be updated.
In the above picture, A part of length 9825 mm is split in 3 different ways, such that each of the split satisfies the rules and the split quantity is not greater than the required quantity.
Range of Possible Joint Position: Gives the details of the range in which the part has to be split. In above case, part can be split between 4412.5 mm to 5412.5 mm.
The same splits are displayed in the split info grid on the Large Part Page.
The remaining quantity of the part that is not split is taken as it is and nested if possible.
Multiple Joints : For large part like columns, more than one joint can be allowed. The only constraint in this case will be the Min Piece Length rule. This rule should be followed by all the pieces for that part.
Eg. If you want to split a large part of length 12500mm, then according to rule the pieces cannot be less than min piece length by rule. You can split the part in following pieces 6000mm, 4000mm and 2500mm (if 2 joints are allowed).