Add User patterns by clicking Add User Pattern button in user pattern Part Page.
On clicking of that button will pop up Make User Pattern Dialog.
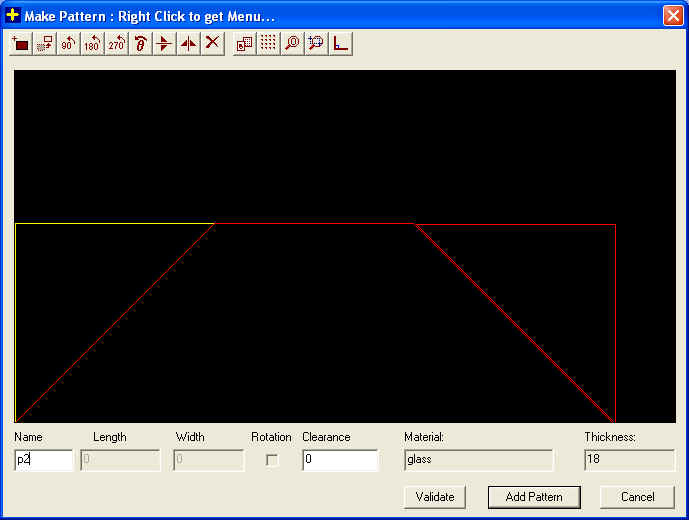
This Dialog contains a Pair Window, where all operations for making patterns will take place. On Right mouse button click inside window will pop up a Context Menu.
A Toolbar is also available inside the Dialog for doing all Operations.
The Context Menu will contain following menu Items:
Add Part - will add a Part to window.
Move - to move the Selected Part, Relative to Bounding Box Origin of the Part
Rotate - to rotate the Selected Part in 90,180 or 270 degrees
Mirror - to mirror the Selected Part along X-axis or Y-axis
Delete - to delete the Selected part.
Grid On/Off - To show or hide the Grid. If Grid is on then while in move operation the point will be snapped to grid points.
Grid Size - To set Grid Size (X) and Grid Size (Y) values.
Zoom - Zoom all will perfectly fits all the drawing inside viewing window
Zoom Window - this will zoom the area which under the Selected window area.
To Add a Part to Pair Window
To add a part to pair window, click Add part in Context Menu.
On Click of Add Part will pop up Select Part Dialog. This Select Part will show all the Names of the Non Rectangular parts in a Combo Box. User has to select the required Part from the Combo Box. There is also a Preview Window inside this dialog, which will show the Selected Part. On clicking Add Button after selecting the required part from the dialog will add the part to Pair Window. In default the new part added inside the Pair Window will be added at the Origin of window. The added part by default will be shown in RED Color.
To Select a Part in Pair Window
Before doing any of operations such as Move, Rotate, Mirror or delete of any part, the part should be selected. Part can be selected by clicking inside it. The selected part will show in YELLOW Color. Only whenever a part is selected, Move, Rotate, Mirror and Delete menus will be Active in Context Menu, Otherwise they will Disabled.
To get rid of Selected Item Press Esc Button
To Move Shapes
To move the Shape in Pair Window, do the Following
Select the Shape, which you would like to move. The selected shape will be drawn in Yellow Color.
Select Move command from Context Menu.
Move the Mouse to Required Place (If needed Put On Grid to Snap to Grid Points) and left click on the required location where which the shape has to be translated.
To Rotate and Mirror Shape
To rotate and Mirror the shape in Pair Window, do the Following
Select the Shape, which you would like to Rotate/Mirror. The selected shape will be drawn in Yellow Color.
Select rotate 90,180,270/Mirror command from Context Menu.
The Selected shape will be appropriately transformed.
Sample
Consider two parts Part A and Part B, which are shown in above picture. Now we want to make the second user Pattern as shown in the picture
Steps to make Pattern
Set the Required Size for the grid.
Activate the Grid.
Select Add part from context menu and select Part B from combo, it will be added in to pair window and by default the new part added inside the Pair Window will be added at the Origin of window.
Select the Part in window.
Move to Some distance along X-axis.
Rotate the Part By 180 degree.
Add part- Part A.
Move the Part B close enough to Part A.
Click Validate Button in dialog, this will find out whether the parts are overlapping. If one of part went inside other part then Validate will pop an error message. Then you have to move the part slightly outside. If Validate succeeds then Frame is drawn in Blue Color around the pair, and the Length, Width of Pair will be populated in their respective edit Boxes.
This is how a pattern is made using this dialog.
Part Name, has to be input in the required Edit Box in the dialog.
Suppose if user needs some cutting clearance around the pair, then he/she has to give the Clearance in the Clearance Edit Box. This clearance is applied to all sides of bounding rectangle of the pair. On Click of Validate will draw the Frame around the Pair taking into consideration of Clearance also.
On click of Add Button will add this User Defined Pattern to the User Defined Pattern Page Grid.
User Defined Pattern Dialog Figure