You can prepare the Stock or Part cut list in another program, and then import that list into PLUS 2D, for instance, you may have the part cut list in a spreadsheet application.
There are two ways to transfer a Part List to PLUS 2D:
The fields can be separated by any Delimiter (Comma, Semi-colon, colon, Tab)
The file does not need to match any particular format.
The columns do not need to be in any special order.
The column names do not need to match the ones used in PLUS 2D. You can even omit the column headers, if you prefer.
This is extremely simple, just select the data, copy and paste into PLUS 2D tables.
This dialog is used when you want to import Stocks (Parts) from a CSV file. A CSV file consists of a set of records where fields are separated by delimiters (comma's or tabs or semicolon or spaces). Each record should be present in a single line.
Delimiter: It is the character used to separate fields in the record in your file. By default the delimiter is comma.
No Of Lines to Skip: If your file has some Non Data Lines at the start, you should specify those lines to be skipped in this edit box.
First row has headers: if your file has got a header before data then you can check this option. This will be used by the package as column header in the Data Preview table.
The import column with and without header is shown below:
Save Settings: Saved Formats are a handy way to save your current settings and are useful if you have to import the same format frequently. These settings are automatically loaded the next time you try to import the data.
Data Preview Table: This table shows first few lines of the CSV file as a preview of the data in the file. If First row has header is checked, then the data of the first line will be used as header, otherwise the column will be named as Col1, Col2, Col3.etc. Any changes you make to the settings are immediately reflected in this table.
Column Mapping Table:
The Table consists of the following columns:
Item: This column displays the fields that have to be imported in the Stock (Part) grid. This is read only, and automatically set depending on what you are importing.
Import Column: Here you specify from which column the data for a particular item is to be read. It contains a combo box which displays the list of columns available in the File.
Example: This is a read only column to give an idea of the type of data expected.
There is a special choice list Expression.
Expression : If you select expression, you can import multiple columns into a single field by using the column name prefixed by $, in the Default column. For instance specifying $1-$2 will make the data in the field equal to the value of col1 and col2. You can also use $0 which is replaced by the line number (for generating unique names). This could be very useful if you want to automatically name the imported parts as Material-Length combination. If the material column is 2, and length column is 3, this can be accomplished by simply setting the value of default to $2-$3.
Default: Here, user can specify default values if you decide to skip some field using the <Expression> option.
Date 12th March 2003
Cutlist for Job No - 2003/GB-21
Id, L, W, Q, Remarks, Order No, Material, Thickness, Due date
p1, 100, 500, 100, part1, 100001, Steel, 12, 31/3/2003
p2, 200, 200, 100, part2, 100001, Carbon Steel, 10, 31/3/2003
p3, 300, 600, 200, part3, 100001, Carbon Steel, 10, 31/3/2003
p4, 300, 300, 100, part4, 100001, Steel, 12, 31/3/2003
p5, 300, 600, 200, part5, 100001, Steel, 12, 31/3/2003
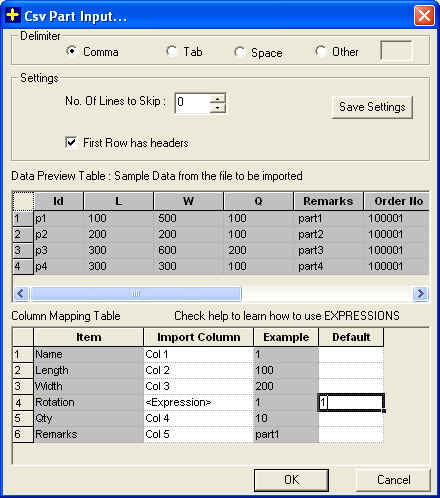
The file does not have data for rotation in file so < Expression> option is selected and default value is set to 1 (Allow rotation).