Bottero OPT file generation and Transfer |
NC sample download |
You will need to do the following one time setting before you start making the NC codes file.
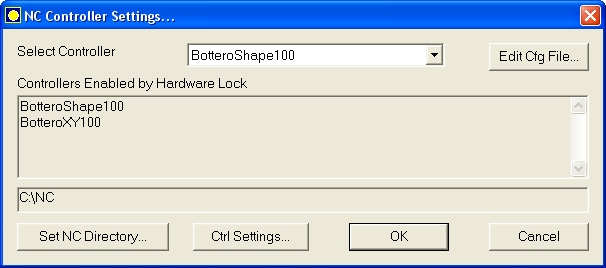
Select the menu NC Links->NC Options...
You will see the following NC Controller Settings dialog...
Select your controller from the drop down list. The list of controllers enabled in the Hardware lock are shown
Set the directory into which the NC files have to be saved.
Note:
1. By default the controller enabled by Hardware Lock is selected and the NC directory is set to "C:" If the List shows NONE then NO controllers have been enabled in your lock and generation of NC codes is disabled.
2. For Bottero Shape you will require one more directory called DAT.
For e.g.: If your selected NC DFor e.g.: If your selected NC Directory is C:\tmp. Then in C: you will have to create a directory named DAT.
To make the Bottero NC file follow the steps shown below.
Optimize the job.
On the Details page, click on the controller CNC button or goto OUTPUT tab, and click on the controller CNC button. Or you can also make the NC codes file from menu NC Links->Bottero Opt.
PLUS 2D will write out the .OPT files into the directory set during NC Options.
Copy the .OPT file into the floppy disk and the .DAT (in case the Job contains shapes) from the DAT directory.
Insert the floppy in the Bottero Machine computer with BCMS running on it.
Now Copy (Ctrl - F2) the floppy disk (USB) contents into the machine.
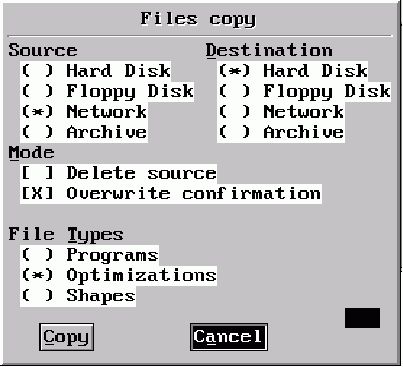
In this window, select Source as Floppy Disk and Destination as Hard Disk.
Select the Modes as Overwrite Conformation.
In File Types select second option, i.e., Optimizations and click Copy button at the bottom.
This will copy all the required files from Floppy disk into the appropriate directories in BCMS.
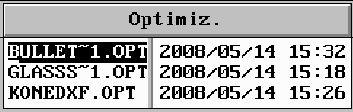
Now to view this Optimization file click F4 and select the file that you have saved from the shown list of files. Once it has loaded the file, you are ready to cut the patterns.
Detail information of Loading, Copying of optimized file and display of Part Identification Number (data) in optimized layout on BCMS
1. Copying
|
Copying of optimized file on BCMS can be done in two ways. 1. Using a Floppy disk/ USB - In this case transfer the folder containng .OPT files in floppy disk. 2. Via network - Copy the folder containng .OPT files on comman network. Before that you have to set the required paths. For that press 'Alt' key. Then select 'Path' option from File menu and you will get the a dialog box. By filling that you can set desired path from which you want to copy the files just like - network path, Floppy drive etc. Start the BCMS software. To copy desired files press Ctrl + F2. A dialog will appear in that select the source from where you are copying .OPT files (Floppy disk / USB or network). Select the destination to where you want to copy the files. Then select the type of files.For copying optimized files select 'Optimization' option and then press Copy button. Program option is provided for drawing a cutting diagram manually on BCMS. |
 |
2. Loading
|
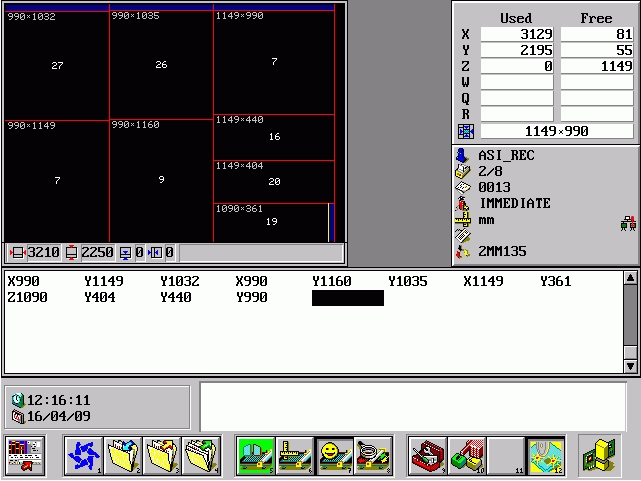
After copying optimization file, to load that press 'F4', you will get a dialog box select the desired file. You can also use arrow keys to go on desired file and after slecting that press 'Enter' key you will get the optimized layout on that screen. If you want go on another layout then press 'Ctrl+B', a dialog box will appeared. Enter the layout no which you want to see as well as cut on machine Also you can use 'Ctrl + PageUp' button to select previous layout or 'Ctrl + PageDown' button to select next layout Overall View is as shown Below. |
 |
 |
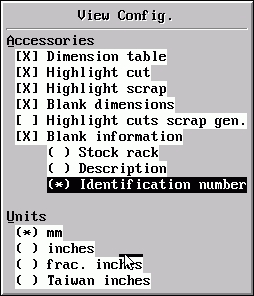
3. Display of Part Identification Number (data)
| You can enable display of part number in the optimised
layout (PLUS 2D - Version 8.xx or later).
Press Alt then select Config->View. In the "View Config" dialog enable Blank Information display. Next enable "Identification number" as shown in the figure. |
|
You can take out hardware lock from Server machine and attach to Client machine from where you want to create NC files.
Now change the NC folder and Remove the hardware lock from client machine and attach it to Server machine again.
You can select your NC option even from your Client machine, just click on the NC Links from Toolbar and then select Bottero OPT.
NC files will get generated inside selected NC directory.